Showing posts with label trim. Show all posts

Wednesday, August 4, 2010

~my chanel jacket - the beginning~

Hi everyone! I'm Sherry and I've just begun my Chanel-style jacket, after having the fabric for a few months!  I hope to share it with you here as well as on my sewing blog pattern ~ scissors ~ cloth.


As you can see it is going to be a fairly standard shape, so I started from my existing jacket block with a princess line, which is a standard NZ size 10, and I graded it up to my measurements, which are a mish-mash of sizes between 10-14!  I made a quick calico toile, and it fitted perfectly - I just need to rotate the sleeve forward slightly. I am after a cropped fitted look, so I will shorten the body to high hip level and the sleeve to 3/4 length.

Luckily I happen to have perfectly matching silk/cotton in my stash, and I will use this for the lining. I have 5m of this silk/cotton, so might even make a matching blouse just like Chanel used to do!
 

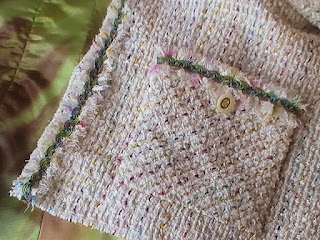
I played around for ages experimenting with trims - I unravelled threads from the cloth and plaited them, crocheted them, and mixed them with existing trims I own. But have finally settled on simply using the selvedge like in the above photo. The fabric reverse has a lot of black threads so it provides a bit of contrast, and the selvedge is pretty cute. The left and right selvedge is slightly different though, so I won't be able to use them together.

And I couldn't help myself, I had to immediately cut out the back blocks and start quilting to see how it would look!:


I machine quilted in the lines of every second check repeat, which amounts to quite a lot of quilting! But I quite like the effect - just like a Chanel handbag ;)
 
So I imagine I will be seeing straight lines for the next few days!

Thursday, February 4, 2010

Trim issues


Here are some updates concerning my jacket.
The first thing I want to talk about today concerns some issues I had with my trim.
I first purchased some trim  I found a tidbit too thin for a Chanel style jacket. After much research concerning Chanel trims I stumbled on Birgitte’s exceptional blog where she explains how to make your own trim.


In the picture above you can see from right to left how mine turned out. First, I made a continuous bias with the fabric I used for the shell. I stitched it in the middle with a very short stitch length (1.5mm) and eventually topped it with the purchased trim. I then fringed the bias strip and inconspicuously hand sew it on the finished CF edge. It is not a very fast process but I spent so many hours in this project so far that I have stopped focusing on time.
Yesterday, I went to town to purchase so more trim but to my great disarray, the shop where I bought it run out of stock.
I had to find an alternative. My mind is quite set up concerning where I want my trim. That is along all edges including the hem. When I went to bed last night, the situation seemed to be hopeless, I could not figure out an ersatz trim and I had already trimmed the pockets and one of the CF edge. But as we say here :”La nuit porte conseil”. When I woke up this morning I had found how to solve that trim issue. The neck and hem lines will be trimmed with the fringed bias only. So that all the edges I had first planned will be trimmed without using another color or motif which would have been too much indeed.


The next step will be to hand sew the weight chain. I must say I am putting great expectations on the chain to improve how the jacket wears though it is already great to wear as far as I can say. The last but not least step will be assembling the sleeves and setting them in. One question I am asking concerning the sleeve is Do I have to make sure that the weaved plaid pattern (small scale) in the sleeve cap area matches the bust. So far I’ve been very careful to match everything and I think it is worth the effort but when looking around I noticed that sleeves are not always matched with the sort of fabric I am using.

Please, tell me what is your own opinion?

Monday, October 26, 2009

Fall colours inspiration


I decided to make a wearable muslin. No, no no, not a wearable muslin - a wearable garment, a version #1, only out of a lesser fabric than my fuzzy, and likely to turn out to be one to fray terribly, mohair. Our gorgeous fall dictated my choice here.

I grabbed a fall-colours cotton or rayon tweed (burn test says no synthetic fibers) purchased a year ago at Ottawa's Fabric Flea Market for a song. There wasn't much of it and I was first inclined to have it as a wiggle skirt, but when the leaves turned this month it leapt up begging to be a jacket – and I loooove making jackets. I made it exactly to spec as above, but then took two 1.5” diagonal cuts out of the top & bottom of CF, to make two V-shaped openings, each about a third of the overall CF length.

This fabric came fully interfaced with black fusible knit, which must've been done industrially as the interfacing wouldn't budge despite laundering, steaming, or high-T pressing, and still had nice sideways flexibility. Great!

(the pic at left shows the jacket's completed, but not yet fully trimmed out. You will notice it has no pockets. I cut out one pocket, but would have to piece a second one, or make welt pockets. The strategic aka easy way out aka DH said, forget the pockets)


I didn't do any quilting on this pre-interfaced baby, though I did tape the neck line and CFs. This body is a straight out of the envelope standard jacket construction, with fashion fabric front & back facings and a bagged lining.


The lining's a nice weight sueded silk twill, dyed with brown Jacquard dye. This was one of my early stovetop dye jobs, and the result came out surprisingly mottled in reddish and golden brown hues. Making lemonade here, an ideal match to my fall tweed! I faced the lower sleeves just to the top of the vent with leftover black silk dupioni from another project. But a little hand-sewing was inevitable: the facings were sewn to the CF-SF SA's, and the side lining seams to the side SA's. Hemmed the bottom by hand & attached a gold chain (pssst: from Home Depot!) at the bottom, under the lining fold.


On to the decoration: that's always the tricky bit, isn't it? I brought a scrap of my tweed to this year's Flea Market to look for nice gold buttons, but I never could find the minimum 6 little + 3 big ones that matched or looked good together (I even considered the “unmatched vintage button mix” look). Lo and behold, I found a set of eight little and four big leather (!) buttons, with just the right mix of yellowish to reddish brown shades. So, four buttons on each vent (I even made a tiny buttonhole for each, in retrospect a ridiculous waste of my time since the buttons cover them completely), in keeping with the non-uniform colour scheme throughout, sewed on with variegated embroidery floss.


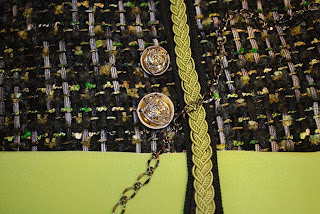
Still to finish: hook & eye closures and the large leather buttons on each side of the middle part of CF. Attachment of the twisted cord piping to highlight the neckline and CF. Advice solicitation: DO tell, should I continue around the bottom hem as well? Once all that's done, I'll post the jacket in action!

trim choice

Due to some usal migraine, I haven't been able to work as much as I expected on fitting my jacket. However, I've made my choice concerning the trim and what I came out with is quite pleasing to my eye.
I will fringe some strips of my fabric an top it with a bought trim matching the colours of the lining. The bought trim is sewn with invisible thread.
The colours of the pictures are not true to the real ones .
I think that this option is quite Chanel-esque. Don't you,

Posted by Picasa

Thursday, October 22, 2009

I am slowly progressing


Posted by Picasa


Even if I am slowly progressing, I am very glad to announce that I started to build my Chanel jacket.
Be warned that the quality of the pics will be very poor due to issues with my usual camera that have been lasting since early summer. My sense of perfection will suffer from that but let's say that poor pictures are better than no pictures at all.
The last post dealing with my jacket was about the fabrics.
Since then I chose the pattern. To be true I shall say the patterns.
Vogue 7975 for the bodice in the shorter view with at least to patched pockets.
I will use Vogue 8259 for the sleeves shortening them to obtain a a 3/4 length .
At that point, I must say that I would not have been able to make my project come true without the help of two awfully kind girls. One of them being no less than Cindy Phelan, one of the administrator of this SAL. The other one is Ann from Ann's Fashion Studio.

THANK YOU CINDY AND ANN. YOU HAVE BEEN SO HELPFUL. YOU ARE MY ANGELS.

Thanks to them I will be able to make the unique 3 piece sleeve and to follow Susan Kahlje method for quilting mentionned in Threads 121.

The next step was choosing the trim. I chose a plain one that has the same colour as the lining. And I intend to embelish it with the brightest multicoulored threads of the main fabric.
This trim will be sewn on two layered fringed strips of my fabric in order to obtain a fringed trim. No picture available yet, it's al in my brains.

Yesterday, I started to make the muslin.I've never made a muslin before and my mind was not quite clear about how to achieve it. I found very detailed explanations here and I intend to follow them them step by step. I know it will take ages but I think the pattern is worth it. In fact it is very versatile and it can make a TNT jacket pattern.

Right now, I've pined basted the jacket muslin made from an old cotton table cloth. I am quite pleased with this fabric choice. It is very easy to work with.

Tomorrow, I will try it on and make the alterations if needed.

That's all so far. I'll keep you posted

MARIE-NOËLLE

Thursday, October 15, 2009

A tale of two (or more) trims

Hi, I've been enjoying the whole Chanel experience. Its been such great fun getting back into sewing again. While looking for the 'perfect' trim I've explored further afield and visited some places I'd heard about but not been to. Saigon fabrics for the silk lining and yesterday EM Greenfield ... and I think I may have found it!

My two early endeavours produced the pale mauve trim, a great match colour-wise, but somewhat insignificant and the purple braid.


The purple gave good contrast, but the style of braid was not what I was after. Encouraged by feedback and ideas from my earlier post, I tried a crochet edge (which didn't work) ...


... then a crotchet chain sewn to the reverse side of the trim, which looked surprisingly ok and was a possible fall back ...


In search of the 'pop' factor, I also tried a contrasting backing ribbon with the pale braid, which looked effective but the combination of trims proved too difficult to curve around the neck edge. It was also too weighty/bulky for the jacket.


So I've been on the hunt for something like the mauve trim but in purple, and yesterday I found it. It looks good on its own ...


... although if I have enough selvage available I'd like to add a fringed edge to tie it back in to the woolly jacket ...


Now I have a question! Do I need to pre-treat the trim, perhaps soak it in a gentle wool wash?

Sunday, September 27, 2009

Dawn - Trim Again

I agree with you on the black ribbon. It was no fantastic. I also tried a purple grosgrain ribbon I had in stash. . Meh. Too thick and boring.


Then I went to Seams Like Home. They have quite the selection and I think I found a winner. First we found this goldish-yellow ribbon. It matches the colors in the boucle.


Then we found this blue to go on it. Wow. Bright, but wow. I think it's great. Loud? Yes. But that's the way I like it.


Better?

Friday, September 25, 2009

In the Zone


Finally, I am ready to get started. I've had my fabric (and muslin fitted) for a while, but finding the trim has proved more difficult than I expected.

I have been looking for something a little more unusual/interesting in aubergine/purple tones, but these two braids are the most promising of the trims I've found to date and neither are especially special or unique. My leaning at the moment is towards the stronger purple braid, as I love the contrast effect of the trim on the traditional Chanel jackets - the paler colour, while a perfect match, is not as dramatic. In the meantime I'll start sewing and keep looking (just in case a better trim presents itself). I also have a ball of wool in the right colour-way and (once the jacket is cut out) any left-over fabric threads that are perhaps another trim possibility.

Monday, September 21, 2009

Dawn - Trim

I have my fabric cut and am messing around with trim. I want something very low key like this black ribbon. I don't know where it came from because I inherited it from my husband's grandmother. This pattern does not have sleeve vents but you can add faux vents. If you need really sharp corners, how are you guys dealing with it? I can also see this being an issue on the pocket flaps.


You can see here that I pressed it down and created sharp edges. I would handstitch these down. What do you think? It must have polyester in it because it pressed well and made very sharp creases.


Here you can see it closer. I can't imagine how I would do this with something that isn't a ribbon. This one I did by mitering the corners and ironing them down.


I'll probably put this away for a few days anyway. I won't be able to go to my local fabric boutique until Saturday. I do want to see what they have available.

Saturday, September 19, 2009

GIDDY!

I am so happy. I was so giddy arranging the fabrics and trims in order to take this picture. It’s that feeling you get when you think you have found a great combination of fabrics, trims and color. Please don’t burst my bubble if I am wrong.

I had to go to New York mid-week to take care of some business. After accomplishing my business objective, I moved on to shopping. After a couple of fabric stores and several trim stores, I managed to make my way to M&J Trimming and left with the trims and the buttons for my jacket.

Manuel, my salesperson, was a great help. He was patience and attentive, which is what I needed. I gave him the website address for this blog. Manuel, if you are reading this, a great big thank you again.

We combined two trims in order to get the look I like. We found buttons that combine the gold and silver tones in the fabric. I chose a blackened metal chain for the hem. The only thing I haven’t purchased is the green thread to match the lining.

Now on to the muslins for my daughter and me.

Friday, September 18, 2009

Moving slowly - trim selection - Sue

Everyone is doing a great job on their jackets. I am moving very slowly but have a plan to break this into manageable chunks so that I do, at least, keep moving on it. First up is to find a trim. In my head I pictured a jacket trimmed with Petersham ribbon. However I can only find Grosgrain ribbon and it can't be shaped to attach around the neckline. So on my recent day trip to Brisbane I found this trim (shown on my fabric).

What do you think? I need to call the shop when I have made a decision so that they can post some up for me if I want it.
Next week I am meeting with my sewing guild group and plan to start drafting the pattern. After that hopefully I will start looking like I am getting somewhere...