Showing posts with label muslin. Show all posts

Sunday, February 14, 2010

Enthusiasm and my lack there of….

OK…I just haven’t been in the blogging mood as of late. So many other things on my mind and to do but today I am making myself sit down and write a few words about my Chanel jacket project. With a cup of coffee in hand and the Olympics on the TV please join me in my musing on my jacket.

Over the past several weeks I have acquired the pattern and resource materials to begin this project. Along with this I purchased the fabric and have now found the lining and thread that I want to use to quilt the jacket with. I am going to think outside the box and add my own spin on my jacket. I found the perfect amber colored lining to go with the boucle that I had purchased from Gorgeous Fabrics and while cruising around Joann’s the other day I came across this great variegated quilting thread that I thought would look great against the lining color and add my own flair to the project by tying the colors of the boucle on the outside of the jacket to the inside lining of the jacket. Here are a few photos of the choices I made for the fabric, lining and thread.


I’ve also traced my pattern off and adjusted it for my measurements. Being 5’10” I have of course added 2” of length to the sleeves and shortened the body by one inch. I also adjusted for my bust, waist and hips. It took me a great deal of time adjusting the pattern. To accomplish this task I used “Pattern Fitting with Confidence” by Nancy Zieman. I have never used her pivot and slide method so thought I’d give it a try to see how it would work on me. Needless to say it took me a whole Saturday bent over my table making my tissue pattern and adjusting it. Here are a few pics.

On Sunday I took the opportunity to cut the new pattern out of my muslin. I’m using the Vogue 8369 jacket pattern which has princess seamed front and side front pieces along with back and side back pieces. The jacket has a two-piece vented sleeve. This pattern doesn't have a pocket option so I may add one to it. I'll play that one by ear and test it out first to see whether I would like it or not.l As I cut each piece out I took the time to mark a full vertical grainline and horizontal lines at the bust and waist along with the various required markings for the pattern with a Sharpie black marker. Here are a few photos of the unsewn muslin.
Front and Side Front Pieces

Center Back and Side Back Pieces

Two-Piece Vented Sleeves


This is where my enthusiasm waned because my plans for sewing this past week were interrupted by a visit from my DD and her boyfriend and this weekend we went north for the Winter Carnival in Saranac Lake and today…here I sit writing this post. I am hoping that after lunch I will gain enough momentum to get myself into the sewing room to begin constructing my muslin. Wish me luck for I am finding it extremely difficult to remove myself from the warmth of the fire!

For your enjoyment some Winter Carnival Ice Castle pics.


Instead of "Happy Trails..." I'll say "Happy Sewing to You...."

Friday, January 15, 2010

Jerilyn - Houndstooth Dentistry

Or perhaps you'd take houndstooth to the Veterinarian? I'm not sure.

Upon dissecting the mens blazer that I will be using for fabric, I discovered 4 holes in one of the inner sleeve panels. My guess is that they are cigarette burns.

Here's how I repaired the damaged "teeth":

Step #1 -

I was able to salvage some black interfacing from the sleeve cuff, it easily tore away from the fabric, so I wasn't sure that it would re-fuse upon ironing, but it did!

Step #2 -

I stitched back and forth over the holes with black thread to prevent fraying. (the 2 larger holes are pictured below)

Step #3 -

Lastly, I used a small tight zig-zag with cream thread to mimic the original pattern.


It's not perfect, but I couldn't afford to lose any portion of the fabric, and it shouldn't be noticeable from a distance.


As for my muslin, it's as far as I'm planning to take it:


I added darts to the chest, and then fixed the arm hole to compensate for the darts. I'm going to cut my panels longer than the pattern/muslin because I think the length is appropriate as it hits unhemmed.


The next step is the most challenging... figuring out how to cut all these panels out of the original jacket! The sleeves had an inner panel similar to the pattern so they will go smoothly, but the back is 2 panels vs the 3 panels of the pattern, and the front... oh don't get me started. There's a small breast pocket on the original jacket that is making me pull my hair out, but I figure it's all downhill after surviving this (she says with the blind optimism of someone at the beginning of the this project).

I'll be sewing this weekend... will you?

Tuesday, November 3, 2009

WIP : 3rd version of my muslin

Last Friday, I tested my altered muslin. I made those alterations looking myself in the mirror as I had no dressform. As I expected the result was far from satisfactory.

Sunday, I brought the jacket to my sister who is a professional drafter. She was so helpful.
She pinned all that needed to be altered and I made a 3rd version of my muslin yesterday.
Moreover, my mother lent me her dress form, so that I can work more efficiently.


Here's how it looks like this morning


Today, I will work on the sleeves and hem lime.
I expect to cut my fabric tomorrow. I am so impatient to do so.
Posted by Picasa

Thursday, October 22, 2009

I am slowly progressing


Posted by Picasa


Even if I am slowly progressing, I am very glad to announce that I started to build my Chanel jacket.
Be warned that the quality of the pics will be very poor due to issues with my usual camera that have been lasting since early summer. My sense of perfection will suffer from that but let's say that poor pictures are better than no pictures at all.
The last post dealing with my jacket was about the fabrics.
Since then I chose the pattern. To be true I shall say the patterns.
Vogue 7975 for the bodice in the shorter view with at least to patched pockets.
I will use Vogue 8259 for the sleeves shortening them to obtain a a 3/4 length .
At that point, I must say that I would not have been able to make my project come true without the help of two awfully kind girls. One of them being no less than Cindy Phelan, one of the administrator of this SAL. The other one is Ann from Ann's Fashion Studio.

THANK YOU CINDY AND ANN. YOU HAVE BEEN SO HELPFUL. YOU ARE MY ANGELS.

Thanks to them I will be able to make the unique 3 piece sleeve and to follow Susan Kahlje method for quilting mentionned in Threads 121.

The next step was choosing the trim. I chose a plain one that has the same colour as the lining. And I intend to embelish it with the brightest multicoulored threads of the main fabric.
This trim will be sewn on two layered fringed strips of my fabric in order to obtain a fringed trim. No picture available yet, it's al in my brains.

Yesterday, I started to make the muslin.I've never made a muslin before and my mind was not quite clear about how to achieve it. I found very detailed explanations here and I intend to follow them them step by step. I know it will take ages but I think the pattern is worth it. In fact it is very versatile and it can make a TNT jacket pattern.

Right now, I've pined basted the jacket muslin made from an old cotton table cloth. I am quite pleased with this fabric choice. It is very easy to work with.

Tomorrow, I will try it on and make the alterations if needed.

That's all so far. I'll keep you posted

MARIE-NOËLLE

Tuesday, October 6, 2009

Fitting the Muslin

I made the muslin for my daughter’s jacket and did a fitting. I have a student who is learning to sew. She observed the fitting, making it part of the lecture. You can see from the picture the alterations I am making.


I am very proud of my student because she has no fear, she just dives in. We are using the trial and error method. She will make a garment in muslin in order to practice sewing techniques, interpreting the sewing instructions on the pattern guide sheet on her own. I then critique the pieces, demonstrating what she needs to do to make it better. She decided she will make a Chanel-style jacket for her first project and will be sewing along with me. As I said, she has no fear, and that’s a good thing. Here's her muslin. I will have her help me with my fitting next.

Wednesday, September 2, 2009

Inspiration and Disappointment


I know many of you are in the process of picking out buttons and trims for your jackets so I thought I'd share this picture of Chanel buttons. I think it is these wonderful details that make the jacket.

Meanwhile, I am disappointed and still waiting to find lining for either of the two pieces of fabric I have. As with so many others my local fabric options are nonexistant so I sent swatches of my fabrics to several well known stores. One of my favorite sources, Josephine's sent some nice swatches but nothing that I loved. Another store which shall remain unnamed and charges for swatches, assured me they had a large selection and sent 10 pieces. Among them a silk brocade and several others that were totally unsuitable for lining. And some of the swatches were only about 1" square. I am hoping to hear from 2 other stores this week so I can get started. In the meantime I'm in a holding pattern and checking often to see what everyone else is accomplishing.

Dawn - Another Muslin Tweak

Again, this is copy/pasted from my personal blog.

I put a tuck in it on the front, sleeves, and back to raise the armscye. I didn't take it apart to do these alterations. I did it while they were all sewn together so the intersections are a lot wonky. I took them up by about 1/2" and I have so much more range of motion. It's amazing how much difference a tighter armscye makes. Obviously, I'll have to move the dart down. It was pretty right on in the other photos but it's too high here.


Back wrinkle is still there. I'm going to tackle that on my next muslin. I think Debbie Cook is correct in that this is a boxy jacket and I'm not boxy. I want to keep the boxy feel so I'll play with the side seams until it falls correctly.


The bust area looks funny but I think most of that is from the dart being in the wrong spot.


You can see there is much less pulling across the front with my arms out.


Here are the alterations. I'll take the tuck in the chest and I'll move the dart down the same amount.


I think I'm about ready to cut into fabric. I am going to start with a cheapy boucle first as my second trial. I plan to finish that one fully but I want to work out the construction before I use my really nice wool boucle. I still haven't decided between the houndstooth and rust-colored boucle. I love them both!

Tuesday, September 1, 2009

Dawn - Jacket Muslin II - KwikSew 3258

I'm copy/pasting from my personal blog so don't read twice unless you really, really want to.


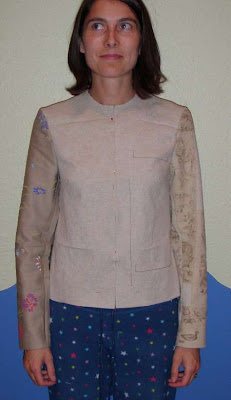
I used up all of my muslin fabric so I'm using this flowered khaki. It's not ideal because it is a stretch twill but it'll do. One thing you need to know if you decide to make this jacket is the arms are skinny. And that's coming from a person with skinny arms. They aren't tight but they ain't loose either. They are fine at the shoulder but they taper pretty steeply from the elbow to wrist.


That back fold is still there and it looks worse than before. I'll play with that tomorrow night.


I accidently cut the sleeve inside out. This is why I love muslins. I don't really have to pay attention. This was the easiest pair of sleeves ever to set.


The armholes are a little low but I'm not sure if I'll raise them. They aren't bad.


Back with my arms folded in front of me.


Boy, is that a smug face or what??!? I feel good about this jacket though because it has gone so smoothly and the fit is pretty good straight out of the envelope.

Monday, August 31, 2009

Dawn - Jacket Muslin - KwikSew 3258

I using KwikSew 3258 for my Chanel jacket. I plan to do view A with the CF zipper and long sleeves.


This is an XS from shoulder to bust. Below the dart I gradually went out to a S for my hips. I drew the grainline and pockets on only one side. The seam allowances at the neck have not been cut off but the hem has been tucked up and pinned.


I'm not sure what to do about these lines. I posted this photo on my personal blog and people said to put in the arms first and see what happens. Duh. I'll do that tomorrow and see how the back looks. The shoulders look really good. Although we'll see what happens when I put the sleeves in. They are the bane of my existence. There is a CB seam but the piece is straight. If I don't alter the back seam I'll cut it out on the fold.


Overall, I think it's pretty good for a first muslin.


Whattcha think?