Tuesday, September 29, 2009

Pictures wearing the jacket

As promised a few pictures of the jacket on me.

This is the combination that I wore on Sunday.

Showing the difference with different colors underneath.


The jacket is reviewed here, the peach dress (which definitely is the wrong color for me) is reviewed here.

If you want to see all pictures that I made for this project start here in my Picasa webalbum.

Of course I only saw that there was a tissue in my pocket after I took all the pictures. Shows how fluid the fabric is.

Monday, September 28, 2009

Assembling the shell - Kathy


I finally finished the shell of my jacket this weekend. Thanks to everyone who left a comment— I did raise the waistline a little following your suggestions. There's been so much to do— making the pockets, putting in the zipper— then I decided I wanted more of an outdoor jacket so I interlined it with cotton flannel. I still have to make and insert the lining. I think I'll just do that by machine although I did sew the collar facing down by hand.

More pictures of the assembly are here and here.

Sunday, September 27, 2009

My new found love of sewing slippery silk

Since this is the first garment I've sewn with a real silk lining I wanted to be sure I didn't botch it. I've also decided on trying Cheri Dowd's shortcuts construction method this time around (Threads article #128) so the cutting and assembly needs to be accurate if the lining is to be bagged first then quilted. In the past I've found this level of accuracy hard to achieve with slippery fabrics, so this time I applied myself more diligently to the task.

Using very fine new pins and fabric weights I secured the silk to tissue paper and cut it out using a cutting wheel (a great suggestion from Sandra Betzina in Fabric Savvy, that worked a treat).


I used lots of fine pins to hold the seam together and sewed over the pins (took courage) using a very sharp 80/12 Jeans needle (which I was assured would be fine and it was, dispite my concern about using a jeans needle for silk).


Then using my new pressing tools I ironed the seams flat (the iron shield was a surprising success as it is used with the iron on the highest setting).


I am so happy with the results!


These are tips that you probably all know. Are there any others you know that I dont?

Dawn - Trim Again

I agree with you on the black ribbon. It was no fantastic. I also tried a purple grosgrain ribbon I had in stash. . Meh. Too thick and boring.


Then I went to Seams Like Home. They have quite the selection and I think I found a winner. First we found this goldish-yellow ribbon. It matches the colors in the boucle.


Then we found this blue to go on it. Wow. Bright, but wow. I think it's great. Loud? Yes. But that's the way I like it.


Better?

Saturday, September 26, 2009

To interface or not to interface ...

As mentioned in previous posts, the lovely wool Sharon and I have chosen is a fairly loose weave and lightweight. I imagine it is lighter in weight than the traditional boucles used in a Chanel jacket. I'm tempted to use a light iron-on interfacing (before cutting it out) to add a bit of structure to the jacket and help reduce the fraying. However I also want it to have the soft cardigan quality typical of this type of jacket. I'm just concerned it may be too soft and perhaps floppy in appearance around the neckline. Sigrid also mentioned her fabric was too thin for quilting. I haven't tested mine yet but am hoping I can include the quilting so perhaps the interface would help. I'd love to hear what other people think and to know what those with thin fabrics are doing. Sharon, what are your plans? I'm not sure how far along you are. I hope you don't mind that we have the same fabric - I don't :-)

Sigrid - Finished

My jacket is finished. I won't question the need for 100-200 hours for a couture-constructed jacket ever again. Though this jacket is far from being made with couture techniques, it took me an enormous amount of time. I didn't count the hours, but it is the most time consuming jacket I ever made and have even more respect for those of you who made/are making such a jacket in the classic couture way.

Inside with chain.

My fabric was too thin for the quilting. I tried but it was no good. I took the "easy" way Threads described as starting point for construction then, but with my own twist. I didn't like the way the lining was completely till the hemline, with the chain on top of the lining. The lining of my jacket is sewn by machine on the sides and neckline. I lined the sleeve and attached the sleeve with the lining in the armhole. After that I made a bias binding around the seam allowance.

The braid is made from a black thread from a special yarn and weft threads of the fabric. Those I crocheted to one long thread and then braided it.

I finished this just in time, as I always planned to make this jacket for a family occasion tomorrow. Though I won't wear it with the dress that was intended to go with it, that's a complete wadder. I'll wear it with a black skirt (sewn too at the last moment) and top, which is a very good combination, if I may say so myself.

I'll try to post a few pictures of me wearing this in the next few days.

Finally I would like to thank Cindy and Antoinette for starting this sew along. Without it I would probably not have ventured into making such a jacket yet. I really liked the experience and seeing all other jackets coming along.

Friday, September 25, 2009

In the Zone


Finally, I am ready to get started. I've had my fabric (and muslin fitted) for a while, but finding the trim has proved more difficult than I expected.

I have been looking for something a little more unusual/interesting in aubergine/purple tones, but these two braids are the most promising of the trims I've found to date and neither are especially special or unique. My leaning at the moment is towards the stronger purple braid, as I love the contrast effect of the trim on the traditional Chanel jackets - the paler colour, while a perfect match, is not as dramatic. In the meantime I'll start sewing and keep looking (just in case a better trim presents itself). I also have a ball of wool in the right colour-way and (once the jacket is cut out) any left-over fabric threads that are perhaps another trim possibility.

Rose - Trim

It's time for the fun part. I still haven't made a decision about the trim for the jacket. I could use the winter white or orange as a binding around the edges. The wool in both colors miters easily so either would work. I don't have any trim or ribbon that will work with the jacket fabric. Of course, I could go shopping! I kinda of like "that's it" feeling and it hasn't come yet. What do you think?


Hopefully, I can put scissors to fabric in the next few days.

Wednesday, September 23, 2009

Rose - Jacket Muslin

Here comes Rose, the Caboose! I think that I am on the train, though. Hope so! .

After looking at numerous patterns, I decided to use KS 3258 for the first of many (I hope!!) chanel jackets. I am going to make view B with long sleeves. I am still debating about putting in a zipper but I don't think that it will enhance my design. I certainly don't need it for most of the Florida winter.
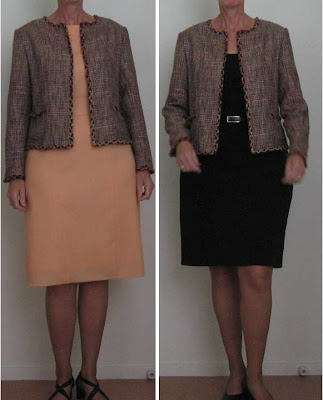
My muslin is a size S in the shoulder, neck, and armscyle area with a size M for the side seams. The only adjustment that I made was a 1/2" petite adjustment in the armscyle area.
I'm pleased with the fit for a first muslin. The adjustments that I think are needed are: raise the bust dart 1/4", add 1" to both sides of the front seam, and shorten the sleeves 1/2". I like the jacket length where it is so I will add a hem allowance.
The side looks pretty good to me and certainly the sleeves are the best fit I've ever done. I have toothpick arms so these narrow sleeves are wonderful for me. The sleeves went in easily although I wasn't real careful about adjusting the ease.
The back fits all right as far as I can tell.
Here are pictures with my hands on my hips. I think that is a way to check on ease. At least I know that I can move in the jacket. In the front view, I can see the horizontal lines on the left side so I know that they are straight. I marked the left pocket flap locations and will raise the top one a bit.
I've made the adjustments on the tissue and did a tissue fitting. That looks good. I am concerned that the front seams don't meet at the top and the bottom. They fit at first and then fall when I move. That was not a problem with the tissue fitting. I'm hoping that adding facings will take care of that.
I welcome any comments and suggestions that anyone has. I'm planning to do a second muslin to check my adjustments. I know the fit will never be perfect with my body but I want to get as close as possible.


Monday, September 21, 2009

Dawn - Trim

I have my fabric cut and am messing around with trim. I want something very low key like this black ribbon. I don't know where it came from because I inherited it from my husband's grandmother. This pattern does not have sleeve vents but you can add faux vents. If you need really sharp corners, how are you guys dealing with it? I can also see this being an issue on the pocket flaps.


You can see here that I pressed it down and created sharp edges. I would handstitch these down. What do you think? It must have polyester in it because it pressed well and made very sharp creases.


Here you can see it closer. I can't imagine how I would do this with something that isn't a ribbon. This one I did by mitering the corners and ironing them down.


I'll probably put this away for a few days anyway. I won't be able to go to my local fabric boutique until Saturday. I do want to see what they have available.

Sunday, September 20, 2009

On My Body - Myrna

It's a gorgeous sunny day here today so I had my husband take a few pictures. It's not a go with outfit. Just my typical black t-shirt and jeans "uniform". I would have been happy enough with this shadowed, front porch shot but I'm sure you all want more details than that. I would!


A front view. I was pleased with how smoothly it fits over the shoulders, chest, and bust. Just right - not too tight or too loose.


And a back view which clearly illustrates why I have signed up for a jean making course in April. The bum of this 47 year old body has definitely dropped. I really Really REALLY want jeans without those back wrinkles which I know from the Palmer/Pletsch pant making course that I took last year is due to the angle of the back crotch curve. I can only imagine what was going on back there that I didn't know about (and maybe still wish I didn't) in life before digital cameras - LOL.


Like I said yesterday, I'm quite pleased with how this turned out. Can't wait to see more and more jackets as you get started and/or finish up.

- Myrna

Saturday, September 19, 2009

Finished - Myrna

Just finished and no one is home to take my picture so here is my jacket on the dress form. I'm hoping to make some go with clothing before the closing date and get a photo of a complete outfit.

This jacket is the one of the few fashion projects I've done in twenty years and more major than any of the others. While there are some things that I'd do different now that I'm done, it was a bit like riding a bike. The how-to aspects came back to me easily and there were a lot of transferable skills from my years in textile art. Overall, a good return to fashion sewing. I'm celebrating.


The pattern was New Look 6632. I added three inches to the length, kept the seam allowance around the neckline but cut it off along center front tapering the line back an additional 1/4" at the hem. The width of the cuff (in the pattern) was added to the sleeve length and the hem was narrowed. These are 3/4 sleeves.


The bias is made from a fabric very similar to silk Dupioni. It's slubbed and permanently wrinkled. The binding was sewn on by machine with right sides together and then slip stitched by hand to the wrong side. The bias, button, and two snaps at center front are the only hand work. Everything else was done by machine.

Inside, the seams are finished with a bright pink silk using a Hong Kong seam finish that you saw in an earlier posting. In retrospect, that was not the best choice of fabrics. It was too lightweight and is already beginning to pull out. Learning. It's good.


The aspects that are Chanel-ish are the top layer of knit fabric, the quilted lining, no facings, the fitted shoulders and design lines, the over-all simplicity that is somewhat deceptive of the amount of work involved, and the "trim" of the binding. It's a very easy to wear, comfortable jacket that still looks structured and fitted.

- Myrna

GIDDY!

I am so happy. I was so giddy arranging the fabrics and trims in order to take this picture. It’s that feeling you get when you think you have found a great combination of fabrics, trims and color. Please don’t burst my bubble if I am wrong.

I had to go to New York mid-week to take care of some business. After accomplishing my business objective, I moved on to shopping. After a couple of fabric stores and several trim stores, I managed to make my way to M&J Trimming and left with the trims and the buttons for my jacket.

Manuel, my salesperson, was a great help. He was patience and attentive, which is what I needed. I gave him the website address for this blog. Manuel, if you are reading this, a great big thank you again.

We combined two trims in order to get the look I like. We found buttons that combine the gold and silver tones in the fabric. I chose a blackened metal chain for the hem. The only thing I haven’t purchased is the green thread to match the lining.

Now on to the muslins for my daughter and me.

Friday, September 18, 2009

Moving slowly - trim selection - Sue

Everyone is doing a great job on their jackets. I am moving very slowly but have a plan to break this into manageable chunks so that I do, at least, keep moving on it. First up is to find a trim. In my head I pictured a jacket trimmed with Petersham ribbon. However I can only find Grosgrain ribbon and it can't be shaped to attach around the neckline. So on my recent day trip to Brisbane I found this trim (shown on my fabric).

What do you think? I need to call the shop when I have made a decision so that they can post some up for me if I want it.
Next week I am meeting with my sewing guild group and plan to start drafting the pattern. After that hopefully I will start looking like I am getting somewhere...

Thankfulness and Claire Shaeffer encouragement

Hi everyone, I've dropped off the face of this blog for a while. The good news is there are so many sew-along participants I bet it was hardly noticeable! As is said, "Life got in the way," first with my day job in mid-August, then with getting my son back into the swing of school, and now with just life in general. I've recently taken on my first custom sewing client, something that many of you have experienced (so you're either excited for me or rolling your eyes about the joys of working with custom clients, haha!), and I'm working on a couple of fall/ winter concepts for my little bitty clothing label. Haven't forgotten about my Chanel jacket, just haven't blogged about it lately. Next week for sure. I've got the pattern and I think I've found the right men's jacket to refashion.

Thanks to Cindy and Gail for holding down the fort, and to each of you for embracing the spirit of this great community and supporting everyone else with gracious comments and helpful advice. It's exciting to see so much progress, and to be exposed to so many neat fabrics and ideas across all the projects around the world!

And thanks to Ms. Claire Shaeffer, who once again thinks of us and offers news, helpful hints, and encouragement:

"

Several weeks ago, I spent a week-end in SanFrancisco. Naturally, I popped over to the Chanel boutique and Britex.

I found some fabulous wool at Britex that I'll use in the Chanel workshop.

At the Chanel boutique, there were several details that I found interesting.
Many jackets fastened at the center front with buttons and loops or hooks and eyes.
Most jackets had no sleeve vent, but they had cuffs--much easier to sew.
One design had a self-fabric camellia on the pockets. It was easily 5" and quilted, but looked more like trapunto. This would be nice in white or pink.

Many of the new designs in the couture collection were shown with lace hose.

I've just returned from Chicago where I gave talks at the School of the Art Institute (SAIC).They have a hands-on collection where I found a wonder couture suit. The fabric was black wool with a diagonal design and it was lined with a blk/wht/grey plaid. The lining was invisibly quilted to the wool so it didn't show on either the face or lining sides of the jacket. I'll have to write about it to explain better.

Hope all jackets are moving forward nicely.

Claire

"

Tuesday, September 15, 2009

Hong Kong Finish - Myrna

I was able to press the princess seam relatively flat and even without clipping which made finishing it quite easy. The bias strips are from a hand dyed silk out of my scrap box. There was just enough. I have two long strips left for the armhole seams. I'll bind them together not open.


Last night I finished seven seams or fourteen edges. It took just over two hours. I'm not sure that's any faster than hand stitching however, it's something I've never done before and I'm quite pleased with how it looks.


I do have one OOPS to work around. When I cut out the sleeves, I cut two the same and have no extra fabric to work with. When I re-cut the curve of the one sleeve, there was only a 1/4" seam allowance left in the narrowest spot. I stitched along the seam line to mark it and will stitch to tissue paper when I put in the easing and then trace the edge something like what's in this image below.


That way, when I pin the sleeve in, I can line the edges up correctly, stitch, and then trim to 1/4" and finish the seam with the bias strips. In theory - it should work just fine. After that, I'll need to figure out the edges.

- Myrna

Monday, September 14, 2009

What have I gotten myself into?

Hi. My name is Kathy and I've been quietly following this blog for a couple months now. I knew I wanted to make a jacket (or three) this fall, but I wasn't sure I wanted a chanel jacket. After seeing the variety of styles people are making though I thought I would jump in.

Here's the picture that inspired my "chanel-ish" jacket:


(Image from Yesstyle.com. I steal a lot of ideas from here.) The version I'm thinking of will have a small standing collar and lose the pleated sleeve caps. Here's a sketch of what I am thinking of and a picture of the fabric I chose:


Where I'm getting myself into trouble is figuring out the pattern. Since I had already gone to the trouble of fitting a jacket pattern (V8541)

and the length and shape (I thought) were similar to this one, I thought I would just change the darts to princess seams and save myself some time.

It hasn't turned out that way. I've made three different muslins. The new muslin is much more fitted than the jacket I started with but I think I'm finally happy with the shape. I plan to move the front seams in just 1/4" inch so the top-stitching will lie where the seam is now. And I'm still a little unsure of where to put the waistline. Do you think it should be higher than shown here? (Sorry it's just a pencil line on the front. It may be hard to see.)

More gory details about fitting (and my geeky thoughts about it) are on my blog.

Sunday, September 13, 2009

Pin Fitting & A Question - Myrna

Did I mention that I haven't sewn much in the last twenty years? It shows however, overall I'm really happy with how my jacket is developing. The fabric is two pieces from stash. I'm not sure of the exact content as they are between ten and fifteen years old.

The top layer is a very stable knit and the bottom layer is satin. I spray basted them wrong sides together, marked a one inch grid with chalk, and zigzagged over the lines with a medium grey thread. Each piece was cut about 2" bigger all around than the pattern piece. When the stitching was done - roughly a 1/2 hour each - the pieces were washed to remove the chalk. The fabric has been through a hot washer and dryer twice.


Here's a detail. It wasn't until I went to lay out the pattern that I realized I'd created a plaid - duh - and would need to match the lines. This is where my lack of current sewing experience showed up. I matched all the across lines but didn't think about the spaces between so at the seams there is sometimes more than an inch between stitched lines. The back is the most likely to be noticed, the side seams not much, and if anyone is that close to my bust to figure it out, good for them! Center front lines up fabulously.


I knew the position of the princess and shoulder seams was correct from the muslin. They were cut and stitched at 5/8". The back and side seams were cut and pinned at 1" to allow for fitting. I'm being careful not to over fit as I want to wear this jacket over jeans. Here's the front and...


... the back.


The hand sewing technique that many of you are using for your seams is really familiar as "quilting as you go" in my (now retired from) career. I wanted to try something new and use Hong Kong seam finishes in a fun color. Does anyone have experience using these on a princess seam? Can it be clipped or not? If so, how does that work. What about around the armhole? Thanks.

- Myrna

I've chosen the fabrics


The lining


This one is for the jacket itself

I have made a choice for the fabrics.
The tweed with multicoloured threads will be used for the shell. It is not made of wool but of a blend of cotton an man made fibre. It was very cheap, I will say about 4$ for a yard. I love the threads shining like gems. It is more of a summer fabric. It really caught my eyes. The only fear I have, is about the quality, but I read that Coco used fabrics that were considered too loose-woven to make jackets. That's why it needs to be quilted.
As for the silk lining it's a love-affaire aswell. I didn't buy it for this project, but when I saw it, it just shout to me " buy me, buy me! "
The colours are tremendous and make me want wrap my whole body with them.
I don't know if I will use the fuschia wool because it is heavier. But I can imagine it would look good as a border/trim. Anyway those fabrics works well together for me. I only have a yard of the fuschia wool and another way to use it would be as a skirt to wear with the jacket.
I'll be very glad to read any of your suggestions.
As a conclusion, I want to thank Cindy and Ann for their very nice help.

Shall I use this one too ?