Saturday, October 31, 2009

The trials of trim

What's a Chanel jacket without trim? The classic (hackneyed?) trim for red is either gold or black. Or both. Last week I was THIS close to getting iron-on gold trim. At the last second, fearing it would look cheap on a casual day topper (trying too hard at best and street wear at worst), I paused.

In the spirit of the fall tweed version, I gave myself permission to use brown (brown being the new black in recent years) and gold colours to trim my orangeish red mohair. I have just the ticket in my stash: a brown/black/yellow/taupe houndstooth, waiting its own turn to be turned into a snazzy suit. Birgitte (bubblegum4breakfast) showed us how to use bias-cut houndstooth strips to make a very cute fringe. To tie these completely different colours to the FF, I looped two mohair weft threads together & stitched them on top. (the warp of this fabric is pure plain wool, and only the weft thread has mohair loops in it).

And, and,,and?? I find the whole effect altogether too fuzzy. So back to the drawing board. Black and gold.

So, today's options are:

gold iron-on trim
.
.
.
.
.


silvery iron-on trim
.
.
.
.
.
.
.
.
.

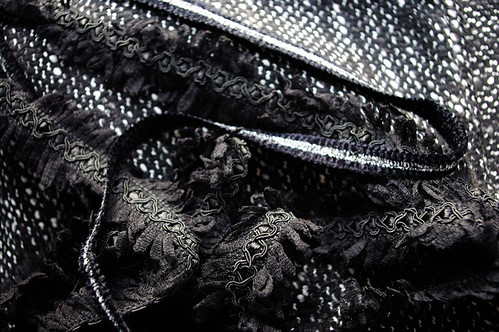
narrow black lace (it's white because the black sold out - and if the store doesn't re-stock, I can dye it, since it's rayon).

Hmmmmm.

Any suggestions?

Any ideas?

Wednesday, October 28, 2009

I FINISHED...

...and although there were times that I thought I wouldn't make it, or that I had bitten off much more than I could chew... I did make it to the finish line. This jacket involed a lot of firsts for me. Of course I had never made a Chanel look-a-like; never thought about quilting a lining to my fashion fabric; never truly bagged a lining; hadn't used much trim, and never completed a challenge.

Three years ago I would have never even thought about starting a project of this caliber.

My Mother sent this beautiful boucle to me last September and I really had planned on making a Chanel suit from it last Fall. Well that didn't happen, but when this challenge came along I signed right up. Of course I experienced some feelings of remorse shortly after joining and even thought about withdrawing my name from the challenge. But I presevered and here is my finished project.


This was quite a challenge and I want to thank Clever Girl and Cindy for setting this up. There are plans for a matching pencil skirt and a dressy blouse made from the same fabric as the jacket's lining. I have learned so much from all of the people who posted here, and I will be making another jacket of this type.
I'll take pictures wearing it as soon as the skirt and blouse are made.

I'll be cheering everyone else on to the finish line...

Is this right??

I am hoping that someone out there can help me. I'm underlining my fashion fabric with batiste to stabilize it, but this is the first time I've done this. Per Sandra Betzina's Threads article, I folded the pattern pieces along the middle on the straight grain to account for the turn of the cloth and then basted them together. In the diagram, it looks like I should have some little rim of batiste peeking out to be trimmed off, and that is what happened on one side of the pattern piece, but on the other side the boucle is overlapping!You can see on the left an edge of batiste under the boucle, but just the opposite on the right.
I was afraid that perhaps my boucle was stretching, since it is such a loose weave, but when I overlaid the pattern piece, it looks OK.

Any thoughts?

Monday, October 26, 2009

Fall colours inspiration


I decided to make a wearable muslin. No, no no, not a wearable muslin - a wearable garment, a version #1, only out of a lesser fabric than my fuzzy, and likely to turn out to be one to fray terribly, mohair. Our gorgeous fall dictated my choice here.

I grabbed a fall-colours cotton or rayon tweed (burn test says no synthetic fibers) purchased a year ago at Ottawa's Fabric Flea Market for a song. There wasn't much of it and I was first inclined to have it as a wiggle skirt, but when the leaves turned this month it leapt up begging to be a jacket – and I loooove making jackets. I made it exactly to spec as above, but then took two 1.5” diagonal cuts out of the top & bottom of CF, to make two V-shaped openings, each about a third of the overall CF length.

This fabric came fully interfaced with black fusible knit, which must've been done industrially as the interfacing wouldn't budge despite laundering, steaming, or high-T pressing, and still had nice sideways flexibility. Great!

(the pic at left shows the jacket's completed, but not yet fully trimmed out. You will notice it has no pockets. I cut out one pocket, but would have to piece a second one, or make welt pockets. The strategic aka easy way out aka DH said, forget the pockets)


I didn't do any quilting on this pre-interfaced baby, though I did tape the neck line and CFs. This body is a straight out of the envelope standard jacket construction, with fashion fabric front & back facings and a bagged lining.


The lining's a nice weight sueded silk twill, dyed with brown Jacquard dye. This was one of my early stovetop dye jobs, and the result came out surprisingly mottled in reddish and golden brown hues. Making lemonade here, an ideal match to my fall tweed! I faced the lower sleeves just to the top of the vent with leftover black silk dupioni from another project. But a little hand-sewing was inevitable: the facings were sewn to the CF-SF SA's, and the side lining seams to the side SA's. Hemmed the bottom by hand & attached a gold chain (pssst: from Home Depot!) at the bottom, under the lining fold.


On to the decoration: that's always the tricky bit, isn't it? I brought a scrap of my tweed to this year's Flea Market to look for nice gold buttons, but I never could find the minimum 6 little + 3 big ones that matched or looked good together (I even considered the “unmatched vintage button mix” look). Lo and behold, I found a set of eight little and four big leather (!) buttons, with just the right mix of yellowish to reddish brown shades. So, four buttons on each vent (I even made a tiny buttonhole for each, in retrospect a ridiculous waste of my time since the buttons cover them completely), in keeping with the non-uniform colour scheme throughout, sewed on with variegated embroidery floss.


Still to finish: hook & eye closures and the large leather buttons on each side of the middle part of CF. Attachment of the twisted cord piping to highlight the neckline and CF. Advice solicitation: DO tell, should I continue around the bottom hem as well? Once all that's done, I'll post the jacket in action!

Better Late than Never!

I've been enjoying watching all of the beautiful jackets come together, and lusting after my own, so I decided to jump on board. I feel very out of my league in this august company (which is likely why I am so late in starting!). This will be the first time I have attempted a lined jacket, so I am planning to simplify it, so that I have fewer opportunities for error.Here is my pattern (New Look 6853). It has the shape, but the sleeves are only one piece. I've been reading and re-reading the two Threads articles in the sidebar, but I don't think I'm ready for all the quilting, so I'm planning to bag this lining as per the pattern instructions. My boucle is a fairly loose weave, so I will be underlining it with batiste. I have a trim that I am reasonably happy with, although it isn't all that exciting, so I'm still on the lookout for something more interesting. I'll handsew that and the chain weight at the hem.

Well, I'm excited! Here we go!

playing catchup

I'm lagging far behind, but hopefully I'll have some time this weekend to catch up with everyone here!

These are my fabric and trim... I'm really leaning towards the fringed one, but I also bought a more subdued chenille trim as well. The fringed trim is from a tiny trim on W 39th street... can't remember the name, but it's shortly before Azymoon on the south side of the street between 7th and 8th. The chenille trim is from MJ Trim. It's black with a silver stripe down the center of it.

My fabric is a black and white wool blend tweed from fabric.com's sale of the Vera Lavendar fabrics. The lining will be a light tan/gray color charmeuse.

black tweed & trim

trim choice

Due to some usal migraine, I haven't been able to work as much as I expected on fitting my jacket. However, I've made my choice concerning the trim and what I came out with is quite pleasing to my eye.
I will fringe some strips of my fabric an top it with a bought trim matching the colours of the lining. The bought trim is sewn with invisible thread.
The colours of the pictures are not true to the real ones .
I think that this option is quite Chanel-esque. Don't you,

Posted by Picasa

Sunday, October 25, 2009

Student's Jacket

I thought I would get to work on my daughter’s jacket, but I was sidelined by a homecoming dress. However, my student is moving along. We have corrected her muslin and she’s cut her jacket. Today she started quilting the pieces. She’s confident enough to continue the quilting at home. Next week’s lesson will be sewing the jacket. Here are the fabrics and trim Kira chose and here’s Kira tying off the sewing threads between the layers. This is so exciting.

Progress report

This jacket is taking much longer than I had anticipated but is nearly done. I spent a lot of time researching and receiving advice on how to do a quilted lining. In the end, I decided that this silk tweed was too fine for quilting. My lining is conventional but hand sewn at the armholes and the hemline.
The next obstacle came when choosing a trim. I went all over Sydney looking for the perfect trim. Defeated I opted for a fairly traditional trim from Spotlight which I used back to front to give this metalic effect.
The trim is only pinned in place to show the effect. Next up - attach the trims and finish the thing! Does anyone have a tip on how to mitre the corners of trim without unravelling and frayed edges?

I CAN SEE THE LIGHT AT THE END OF THE TUNNEL NOW...

I was so busy with work and homework this week that I hadn't touched my jacket since last Saturday's all day sewing marathon. So my friends and I had a early Saturday evening dinner, had our show and tell session, and then preceeded to sew for about 6 hours straight. Quite progressive, but I still did a lot of work on the jacket today.

I did get my sleeves in yesterday, and guess what?, they match with the jacket front and back. I was so afraid that they wouldn't match. Could it be...that I have finally learned to match stripes/checks/plaids?


I don't know about all of you, but I cannot make this thing work! I've tried several times to no avail. I'll try again later, but in the meantime,

I learned of this magnificent technique in a post from Cindy at Color by Number. So sim1ple! So useful! I'm in love with this and will be using it A LOT! THANKS FOR SHARING CINDY! I used her technique to make the bias tape from my jacket lining fabric. Worked like a charm! So I enclosed the sleeve cap seam with my beautiful bias tape. Learning to make bias tape for this jacket also helped me accomplish one of the goals I set for this year.

I had to hem the sleeves because I forgot to bag them according the the Thread's Magazine article. Can we all say "LOTS OF HAND STITCHING". Now all that is left to do is to attach the trim and add the chain at the hem.

I had to decide on the placement for the trim; I think I like this placement best. And then decide how much of the trim to use, and where to place it. I really like the jacket and the trim, but I don't want to chance making it look gaudy. I'm thinking about placing the trim down the front, the neck area, and the faux pocket flaps only. Traditionally the trim is also placed on the sleeve and the bottom hem of the jacket, but I don't know. WHAT DO YOU THINK???

I can see the light at the end of the tunnel now...


Late to the Chanel Party


I am very late to the Chanel Party.

I originally signed up, submitted inspirational pictures and posted fabrics, and then went into hiding. That was my last Chanel post. I officially and unofficially withdrew. I lurked on the site, posted nothing, found courage and I'm back with a slightly different approach. I am concrete random at best. Always a plan. I just change it as I see fit.......So here is the final approach-I will see it through to completion.
  • Chanel jacket will be for D1. She is thrilled. Her requests were: furry trim,tight fitting, pockets,and gold buttons for sleeve vents.

  • A merging of 2 patterns. A Vintage 1961 Advance pattern, for the excellent sleeve vents and Chanel like qualities. Vogue 7975 for the basic shell. I will merge sleeves from Advance with Vogue shell .


Inspiration picture: Linda Evangelists in BWOF 9/2009 with her Chanel jacket
Fabric: Cotton/Linen boucle from emmaonesock with lurex strips throughout. Do these match or what???? I actually had this fabric in my stash.........uncanny resemblence.
Trims: one sided black furry from MandJ Trimming
Two edged furry trim with a skinny trim on top from M and J Trimming
Are "furry" and "skinny" couture adjectives? If so, I am using them like I know what I am talking about.
Chanel Literature: I will rely on these three books and countless bloggers before me.
Muslins to date: muslin front. Sleeve is very long and wide, shoulder needs some adjustment. Waist and bust look good.
Muslin Back: Big in the shoulder, arm, some work to do. General idea on track.
Next: Adjust muslin, and then cut out fabric and lining, and thread trace..... D1 won't be home from college for a couple of weeks so this will be a slow process.....

Oo-wee - I'm in!

A late arrival here, and hi to y'all. I bumped into this delightful blog only last week - fortuitously perhaps, or more likely not, as I've been working on my own two Chanel-esque jackets these past few weeks, and have been looking for image & info ideas. Lo and behold - look what popped up right near the top. Your lovely, lovely, fun titled sewalong.

Some of you may remember me from the GreatCoatSewAlong, and what a fabulous learning experience that was. I will never fear padstitching, ever again. Oh sure, you say, that's why you're now making a Chanel jacket: no lapels or collar to padstitch! Ummmm......

I loooove making coats & jackets, and though I make all the other stuff too, they're definitely in supporting roles. With my busy work schedule, I just don't have the time to post about these lesser actors. But jackets, oh! there's something just so delicious about the smell of steamed wool and silk, and slipping on a nice jacket lined with sueded silk jacquard, with nothing but a little tank top underneath, feeling that silk sliding up my arms, yum!

My late summer efforts have been the Nannette Lepore knockoff (McCall's 5815 with bracelet sleeves, in cornflower blue wool crepe), the Vogue 1098 jacket in cream wool crepe, and this little Burda coat. I'll have to post reviews for the jackets, I know.... eventually.

So, on to the Chanel. I started this process a couple of weeks ago, motivated by the dropping temps and a wish to finally have a new red sweater-like jacket for casual Fridays at work. We're encouraged to wear red on casual Fridays, and it's high time for another version of red Friday. I just happen to have a 75/25 wool-mohair blend, purchased a year ago last summer from Dorr Mills in NH. A great place, btw, if you happen to be in the state and love wool as much as I do. Oh the colours, the tweeds, the herringbones! The weather was so pathetic this summer we didn't go, but next summer, for sure! But I digress....

I've known for a long time that I'd be making a Chanel jacket eventually, and have had both Vogues 7975 and 8259 for a couple of years. I'm using V7975 for the body, as I think its shape is less boxy than the other one, and V8259 for the tres haute couture three piece, vented up to there, sleeves.

The muslin: initially a straight 10. Took a 1/4” tuck just above waist in the centre back piece, tapering to nothing at side seam. Lowered the back neck to the size 8 line. Dropped the shoulders 1/4” at the sleeve seam, and pinched out a bit out of the upper princess seams, to bring the shoulders in 5/8”. Added 3/8” FBA to each side of each front princess seam over the bust (a total of 1.5”). Cut each body piece 1/8” wider below the waist, and sewed a standard 5/8” SA, giving myself an extra 1.5” ease over the hips. Made just one V7975 sleeve, to establish finished length & ease, and then adjusted the V8259 sleeve pieces for same length & width. The finished back length is 22.5”. No photos, sorry!

Next: wearable muslin, aka Digs' Chanel #1. With pics.

Update

Hi. I'm here. I haven't forgotten you ladies. I went through my stash last night and found these items. I am going to begin constructing one of these jackets this week. I am taking the shortcut by using the info in Threads #128.

Finished! (and a vote for hand-sewing)


My jacket is finally finished. Hooray! I tried first to inset the lining by machine, but I had a hard time keeping the curved edges on the bottom aligned and the misalignment caused the bottom hem to flare out in the back. So after putting it away in frustration for a couple weeks, I took out the seam and re-sewed it by hand. I was pretty pleased with the result and it didn't take as long as I thought. Because of the texture of the fabric my stitches are pretty invisible. Here's a shot of the inside:

Overall I am really pleased with the jacket. It is comfortable to wear, goes with most things, and adds a nice layer of warmth. The flannel interlining didn't add too much bulk and makes it quite a bit warmer. There are a couple more pictures of the finished jacket here.

Friday, October 23, 2009

Threads 121-- Step 1

Today I thread traced most of my muslin pattern pieces to my boucle. Darn, it takes a long time! Still on step 1 of the Susan Khalje's Thread 121 article...This fabric has wrecked me. It is gorgeous to the eye and touch. I love it.

The article states to pin all the pieces to the fabric before thread tracing. I am using my kitchen counter which is quite large, but I still wasn't able to fit all the pieces on it at one time. I am doing it in two stages...but don't worry...I made sure that I had plenty of fabric!

After thread tracing on the seamline, I left a 1 1/2 inch seam allowance. The article states at least 2 inches but it seemed a bit extreme.

I am ready for step 2! If I only had my silk charmeuse...maybe it will come tomorrow!

Thursday, October 22, 2009

Full Steam Ahead

It is Thursday and I am finally blogging my Chanel progress. I am taking it slow. Mostly due to a nasty head cold which has made me a bit lazy this week. I ended up steaming my boucle for pre-treatment. I felt, it was the most gentle way to go and it is too early in the project to ruin the fabric!
I had Mood Fabrics in NY send pink charmeuse samples for the lining. I order the perfect pink for only $15./yd. Much cheaper than at Vogue Fabrics!

I am using Susan Khalje's Threads 121 article for the construction. I am going step by step. Step one...make the muslin...check...dismantle the muslin...check....

Label all the pattern pieces and cut off all seam allowances...check.


After pressing the muslin pattern, draw in all grade lines...check...
Presently I am pinning my muslin pattern pieces to the boucle and thread tracing . I will be back with more progress!

I am slowly progressing


Posted by Picasa


Even if I am slowly progressing, I am very glad to announce that I started to build my Chanel jacket.
Be warned that the quality of the pics will be very poor due to issues with my usual camera that have been lasting since early summer. My sense of perfection will suffer from that but let's say that poor pictures are better than no pictures at all.
The last post dealing with my jacket was about the fabrics.
Since then I chose the pattern. To be true I shall say the patterns.
Vogue 7975 for the bodice in the shorter view with at least to patched pockets.
I will use Vogue 8259 for the sleeves shortening them to obtain a a 3/4 length .
At that point, I must say that I would not have been able to make my project come true without the help of two awfully kind girls. One of them being no less than Cindy Phelan, one of the administrator of this SAL. The other one is Ann from Ann's Fashion Studio.

THANK YOU CINDY AND ANN. YOU HAVE BEEN SO HELPFUL. YOU ARE MY ANGELS.

Thanks to them I will be able to make the unique 3 piece sleeve and to follow Susan Kahlje method for quilting mentionned in Threads 121.

The next step was choosing the trim. I chose a plain one that has the same colour as the lining. And I intend to embelish it with the brightest multicoulored threads of the main fabric.
This trim will be sewn on two layered fringed strips of my fabric in order to obtain a fringed trim. No picture available yet, it's al in my brains.

Yesterday, I started to make the muslin.I've never made a muslin before and my mind was not quite clear about how to achieve it. I found very detailed explanations here and I intend to follow them them step by step. I know it will take ages but I think the pattern is worth it. In fact it is very versatile and it can make a TNT jacket pattern.

Right now, I've pined basted the jacket muslin made from an old cotton table cloth. I am quite pleased with this fabric choice. It is very easy to work with.

Tomorrow, I will try it on and make the alterations if needed.

That's all so far. I'll keep you posted

MARIE-NOËLLE